Author Archives: Taufiq

How to Send MMS Using MOBITEK Q25 Modem

Note:-

  1. The correct AT commands for sending MMS is saved in “X:\Reports by Trainees\Taufiq\A20-T-30-4G Modem (Q25)\MMS\MMS Script.ini”.
  2. The MMS settings (AT+QMMSCFG=”mmsc”, AT+QMMSCFG=”proxy, etc.) cannot be saved using “AT&W”, the settings must be re-set after modem is rebooted.
  3. Must use QCOM instead of Hyper Terminal to upload image file.
  4. When MMS is successfully send, the response is “+QMMSEND: 0,200”


AT COMMANDS FOR MMS

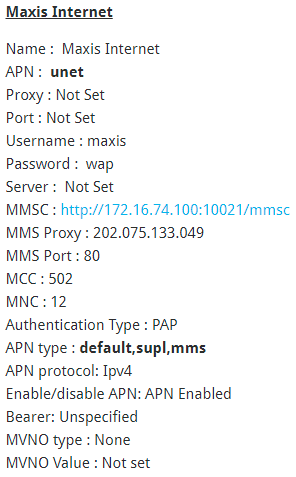
Note: This script is located in “X:\Reports by Trainees\Taufiq\A20-T-30-4G Modem (Q25)\MMS\MMS Script.ini”. It must be executed one-by-one because the delay time is not set. Load the script in QCOM to use it. The MMS Settings used is MAXIS’s MMS Settings:

AT COMMAND DESCRIPTION
AT+CPIN? To enter a password or query whether or not the module requires a password.

If the reply is “+CPIN: READY”, meaning the module is not pending for any password.

AT+QICSGP=1,1,”unet”,”maxis”,”wap”,1 Configure parameters of a TCP/IP context.

AT+QICSGP=<contextID>,<context_type>,<APN>,<username>,<password>,<authentication>

AT+QIACT=1 Activate a PDP context.
AT+QIACT? OPTIONAL.

Return the list of the current activated contexts and their IP addresses:

+QIACT: 1,1,1,”100.66.207.181″

+QIACT: <contextID>,<context_state>,<context_type>,<IP_address>

AT+QMMSCFG=”contextid”,1 Set the PDP context ID.
AT+QMMSCFG=”contextid” OPTIONAL.

Query the PDP context ID.

+QMMSCFG: “contextid”,1

AT+QMMSCFG=”mmsc”,”http://172.16.74.100:10021/mmsc” Configure the URL of MMSC.
AT+QMMSCFG=”mmsc” OPTIONAL.

Query the URL of MMSC.

+QMMSCFG: “mmsc”,”http://172.16.74.100:10021/mmsc”

AT+QMMSCFG=”proxy”,”202.75.133.49″,80 Configure the proxy address and port of MMSC
AT+QMMSCFG=”proxy” OPTIONAL.

Query the proxy address and port of MMSC.

+QMMSCFG: “proxy”,”10.0.0.172″,80

AT+QMMSCFG=”sendparam”,6,2,0,0,2,4 Configure the sending parameters.

AT+QMMSCFG=”sendparam”,<valid>,<pri>,<sendrep>,<readrep>,<visible>,<class>

AT+QMMSCFG=”sendparam” OPTIONAL.

Query the sending parameters.

+QMMSCFG: “sendparam”,6,3,0,0,2,4

AT+QMMSEDIT=1,1,”+60174616341″ Add a phone number as a recipient.
AT+QMMSEDIT=1 OPTIONAL.

Query the recipient phone number.

AT+QMMSEDIT=1,1,”+60174616341″

AT+QMMSEDIT=4,1,”Test MMS” Edit the title of the MMS message.
AT+QMMSEDIT=4 OPTIONAL.

Query the title of the MMS message.

+QMMSEDIT: 4,”ASCII”,”Test MMS”
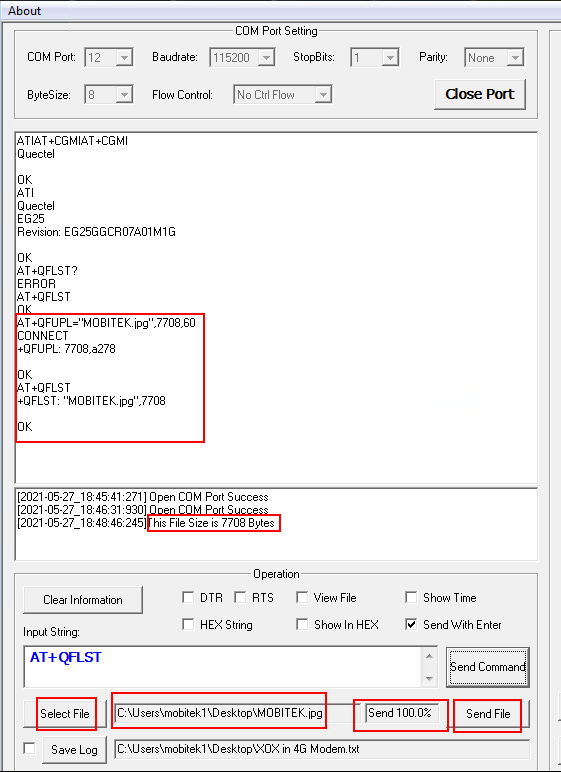
AT+QFUPL=”RAM:MOBITEK.jpg”,58773,60 Upload a file to RAM. The file will be saved as “MOBITEK.jpg” and the maximum size of file is 7708 bytes. 60 indicates timeout value, and 1 indicates ACK mode.

Wait for:

CONNECT

Then select the file to upload and click “Send File”:

The response after the file successfully uploaded:
+QFUPL: 7708,8fd3

AT+QFLST=”RAM:*” OPTIONAL.

Query all files in RAM.

+QFLST: “RAM:MOBITEK.jpg”,7708

AT+QMMSEDIT=5,1,”RAM:MOBITEK.jpg” Add attachments for the MMS message.
AT+QMMSEDIT=5 OPTIONAL.

Query the attachments.

+QMMSEDIT: 5,”RAM:MOBITEK.jpg”

AT+QMMSEND=5000 Send the MMS message.
AT+QFDEL=”RAM:*” Delete the RAM file.

Query all files in RAM.

AT+QFLST=”RAM:*” OPTIONAL.
AT+QMMSEDIT=0 Clear the content of the MMS message.
AT+QMMSEDIT=1 OPTIONAL.

Query the recipient phone number.

AT+QMMSEDIT=4 OPTIONAL.

Query the title of the MMS message.

AT+QMMSEDIT=5 OPTIONAL.

Query the attachments.


Enable VT-x in HP Compaq Elite 8300 if VirtualBox Unable to Run or Unable to Save Any Setting

Problem: Oracle VirtualBox does not allow the setting of a virtual machine to be saved as the “OK” button is disabled (grey out).

  1. Unable to save setting in VirtualBox in HP Compaq Elite 8300:-
  2. This error message will appear when running the virtual machine:-
    VT-x is disabled in the BIOS for all CPU modes
    (VERR_VMX_MSR_ALL_VMX_DISABLED


Solution: enable VT-x in BIOS of HP Compaq Elite 8300.

  1. Restart the PC, enter F10 to enter BIOS.
  2. Under the “Security tab, use the up and down arrows to select “System Security, and then press Enter.
  3. Use the up and down arrows to select “Virtualization Technology (VTx), then use the left and right arrows to select either “Enabled or “Disabled as desired.

Source: https://support.hp.com/my-en/document/c04760917

How to Rename VB.Net Project

  1. Open the project’s root folder.
  2. In Windows Explorer, right-click on project’s Main solution (.sln) → “Rename”.
  3. Open the project in Visual Basic. In “Solution Explorer”, right-click on project → “Rename”.
  4. In “Solution Explorer”, right-click on project → “Properties” → goto “Application” tab, rename “Assembly name” and “Default namespace” to match the project’s name.
  5. If you wish to also rename the namespace, open one of your class files. Right click the namespace →”Rename…. ” This should search and replace all references to your namespace throughout the project.
  6. Close the project. Delete the old “Solution User Option” (.suo).
  7. In Windows Explorer, right-click on project’s subfolder → “Rename”.
  8. Edit the .sln file and change the path of “.vbproj”.

Source: https://stackoverflow.com/questions/211241/how-can-i-rename-a-project-folder-from-within-visual-studio

Total Records Updated in the Tables of E-Mail Subscribers v. 4.4.8

Upon executing this SQL Statement:-

UPDATE `wp_ig_contacts`
INNER JOIN `wp_ig_lists_contacts` ON `wp_ig_contacts`.`id` = `wp_ig_lists_contacts`.`contact_id`
SET `wp_ig_contacts`.`updated_at` = "2021-07-06", `wp_ig_lists_contacts`.`status` = "unsubscribed"
WHERE `wp_ig_contacts`.`email` IN (SELECT `email` FROM `wp_ig_contacts_returned`)


If 1 email address belong to 1 group then 2 records will be updated:-

  • 1 record in table “wp_ig_contacts” will be updated with `updated_at` = "2021-07-06"
  • 1 record in table “wp_ig_lists_contacts” will be updated with `status` = "unsubscribed"

If 1 email address belong to 2 groups then 3 records will be updated:-

  • 1 record in table “wp_ig_contacts” will be updated with `updated_at` = "2021-07-06"
  • 2 records in table “wp_ig_lists_contacts” will be updated with `status` = "unsubscribed"

How to Solve “BadImageFormatException”

Applies to: SMS API v. 9.2 in Visual Studio Community 2019 and Windows Server 2019 64-bit

Problem: when SMS API v9.2 sample program in run in debug mode, Visual Studio Community 2019 always give this error :-

Inner Exception 1:

BadImageFormatException: Could not load file or assembly ‘Interop.MobitekSMSAPI9, Version=1.0.0.0, Culture=neutral, PublicKeyToken=null’ or one of its dependencies.

This assembly is built by a runtime newer than the currently loaded runtime and cannot be loaded.

Solution: change the “Target Framework” of the project to “.NET Framework 4” with these steps:-

  1. Migrate the project “SMS API v. 9.2” to open in Visual Studio 2019.
  2. Open the project. Go to the project “Properties”. In “Application” tab, change the “Target framework” to “.NET Framework 4”.
  3. You will get below warning after changing the “Target framework”. Just click “Yes”.
  4. Close and reopen the project.
  5. Click “Start” button to start debugging the project. Please allow some times for the project to be built.
  6. After the project has completely built, try to click all menus and buttons to see if the problem occur again.

How to Install USB Driver of MOBITEK Q25 and Find the COM Port Number

Step 1: DO NOT connect USB cable or connect modem to PC/server.

Step 2: Install the USB driver first by extracting the “.zip” file after downloaded and run the “setup.exe”. USB driver can be downloaded from here – Download USB Driver

Step 3: Choose the installation folder or path, then click on ‘Next’.

Step 3: Click on ‘next’. Wait until the installation complete.


Step 4: Click on ‘Install’.

Step 7: Make sure to restart the machine or computer in order to use the installed driver.

Step 8: After computer is restarted, connect the modem to the computer. In device manager, the connected modem is listed as ‘Quectel USB AT Port (UMTS)’. In this example, the modem is connected to COM port number 8.

How to Use MOBITEK E-Mail Address Extractor to Extract E-Mail Addresses from Inbox


MOBITEK® E-mail Address Extractor is an useful digital marketing tool to extract the e-mail addresses from the body or the header of an e-mail. E-mail address extracted and then be imported into any e-mail broadcasting application or can be used to remove undeliverable e-mail address.

Note: free version does not support extracting e-mail address from Gmail and Yahoo Mail.

User’s Guide

  1. Run “MOBITEK E-mail Address Extractor.exe”.
  2. Go to “Settings” -> “POP3 Settings”.
  3. In “Settings”, enter “Server Name”, “Username” and “Password” for POP3 e-mail. In “Security Settings” area, select the “Connection Security”, choose whether to use the default “None” or “SSL/TLS”. The “Port” will automatically change based on the selection.
  4. To extract e-mail address from the body of e-mail, select “Extract E-mail Address from Body of E-mail”.
  5. To extract e-mail address from the header of e-mail, select “Extract E-mail Address from Header”.
  6. To extract e-mail address from only “Cc”, “To” and “From” section, select “Extract E-mail Address from ‘to’, ‘cc’ and ‘from’.
  7. If you entered the wrong login information, you will a warning message, please re-check the settings (user name, password, etc.).
  8. To cancel the extraction process, click the “Cancel” button.
  9. After the extraction completed, a summary of the extraction process will be displayed.
  10. All extracted e-mails will be shown in the “List of Extracted E-mails” tab. The total number of e-mails extracted will be shown in “The total e-mail(s) extracted”.  Copy e-mail addresses and paste a spreadsheet (csv) file that can be imported into any e-mail broadcast application.
  11. Any duplicated e-mail extracted will be shown and added into “List of Duplicate E-mails” and the total number of duplicates shown in “Total duplicate e-mail(s)”.